AAA-12: Difference between revisions
Touched up the AAA-12 to have a more accurate Infobox, need to figure out pellet count |
|||
| (8 intermediate revisions by 4 users not shown) | |||
| Line 4: | Line 4: | ||
[[File:AAA12.png|center|thumb|200px]] | [[File:AAA12.png|center|thumb|200px]] | ||
|label2 = Damage | |label2 = Damage | ||
|data2 = 12. | |data2 = 9 pellets X 12.5hp | ||
|label3 = Headshot Multiplier | |label3 = Headshot Multiplier | ||
|data3 = X2 | |data3 = X2 | ||
|label4 = Capacity | |label4 = Capacity | ||
|data4 = 117 | |data4 = 13 shells x 9 pellets (117 pellets) | ||
|label5 = Fire-Rate | |label5 = Fire-Rate | ||
|data5 = 0.34 ( | |data5 = 0.34 (Average) | ||
|label6 = Movement Factor | |label6 = Movement Factor | ||
|data6 = 1 (Unchanged) | |data6 = 1 (Unchanged) | ||
| Line 20: | Line 20: | ||
|data9 = 1 (Unchanged) | |data9 = 1 (Unchanged) | ||
|label10 = Traits | |label10 = Traits | ||
|data10 = Two-Handed, Automatic | |data10 = Two-Handed, Automatic, Hit-Scan | ||
}} | }} | ||
== Brief Information == | == Brief Information == | ||
The AAA-12 is styled after the Atchisson AA-12 | The AAA-12 is styled after the [[wikipedia:Atchisson_AA-12|Atchisson AA-12]]. Similarly to the real gun, it is an automatic with a relatively high fire rate for a shotgun. The shotgun has a high spread, and while it can occasionally hit distant shots, it is best used for short range fights. | ||
== Recommended Strategies == | == Recommended Strategies == | ||
| Line 31: | Line 31: | ||
== Maps Available == | == Maps Available == | ||
* | * Arena_03_Alt | ||
* Arena_05_Alt | |||
* Arena_06_Alt | |||
* Arena_07_Alt | |||
* Arena_13_Alt | |||
* Arena_14_Alt | |||
* Basket_Yek_Alt | |||
* Bazaar_02_Alt | |||
* Bazaar_03 | |||
* Chateaux_06_Alt | |||
* Corridor_00_alt | |||
* Corridor_02_alt | |||
* Corridor_03_Alt | |||
* Corridor_07_alt | |||
* Dragonfly_Vestige_Alt | |||
* ICE_01_Alt (Pipe) | |||
* Neo_Arena_11_Alt | |||
* Neo_Arena_12_Alt (Vending Machine) | |||
* Republic_00_Alt (Vending Machine) | |||
* Sonova_RoadSide_Alt | |||
* StLucia_02_Alt | |||
* StLucia_03 | |||
* StLucia_03_Alt | |||
Latest revision as of 18:49, 8 March 2026
Brief Information
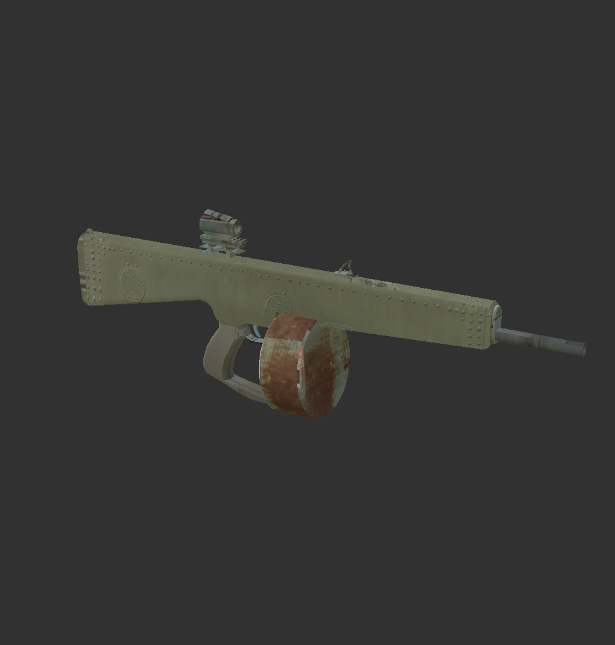
The AAA-12 is styled after the Atchisson AA-12. Similarly to the real gun, it is an automatic with a relatively high fire rate for a shotgun. The shotgun has a high spread, and while it can occasionally hit distant shots, it is best used for short range fights.
Recommended Strategies
Closing the distance with your opponent is the best option to maximize damage output.
Maps Available
- Arena_03_Alt
- Arena_05_Alt
- Arena_06_Alt
- Arena_07_Alt
- Arena_13_Alt
- Arena_14_Alt
- Basket_Yek_Alt
- Bazaar_02_Alt
- Bazaar_03
- Chateaux_06_Alt
- Corridor_00_alt
- Corridor_02_alt
- Corridor_03_Alt
- Corridor_07_alt
- Dragonfly_Vestige_Alt
- ICE_01_Alt (Pipe)
- Neo_Arena_11_Alt
- Neo_Arena_12_Alt (Vending Machine)
- Republic_00_Alt (Vending Machine)
- Sonova_RoadSide_Alt
- StLucia_02_Alt
- StLucia_03
- StLucia_03_Alt
